Unless your ready to go back to the ole axe and maul, you want to take good care of your hydraulic log splitter.
Any kind of machine needs proper, periodic maintenance and your hydraulic log splitter is no different. In fact, the combination of a worn out leaky hose, and high pressure hydraulic fluid is enough to cause severe injury. A well-maintained log splitter will ensure that both your log splitter, and you, can continue to split cord after cord of wood.
Some other common maintenance concerns, in addition to old hoses, are: dirty or contaminated hydraulic fluid, a rusty hydraulic ram or damaged shaft seal, loose engine parts or pump parts.
Selecting the best log splitter isn’t the only thing to worry about. Making sure your investment remains the best log splitter is even more important. There’s much cheaper options for lawn art;)
Hydraulic Log Splitter Maintenance Tips & Tricks
The below steps focus on those things unique to log splitters. If you have a gas log splitter, you will of course want to perform the regular maintenance any small engine requires as well.
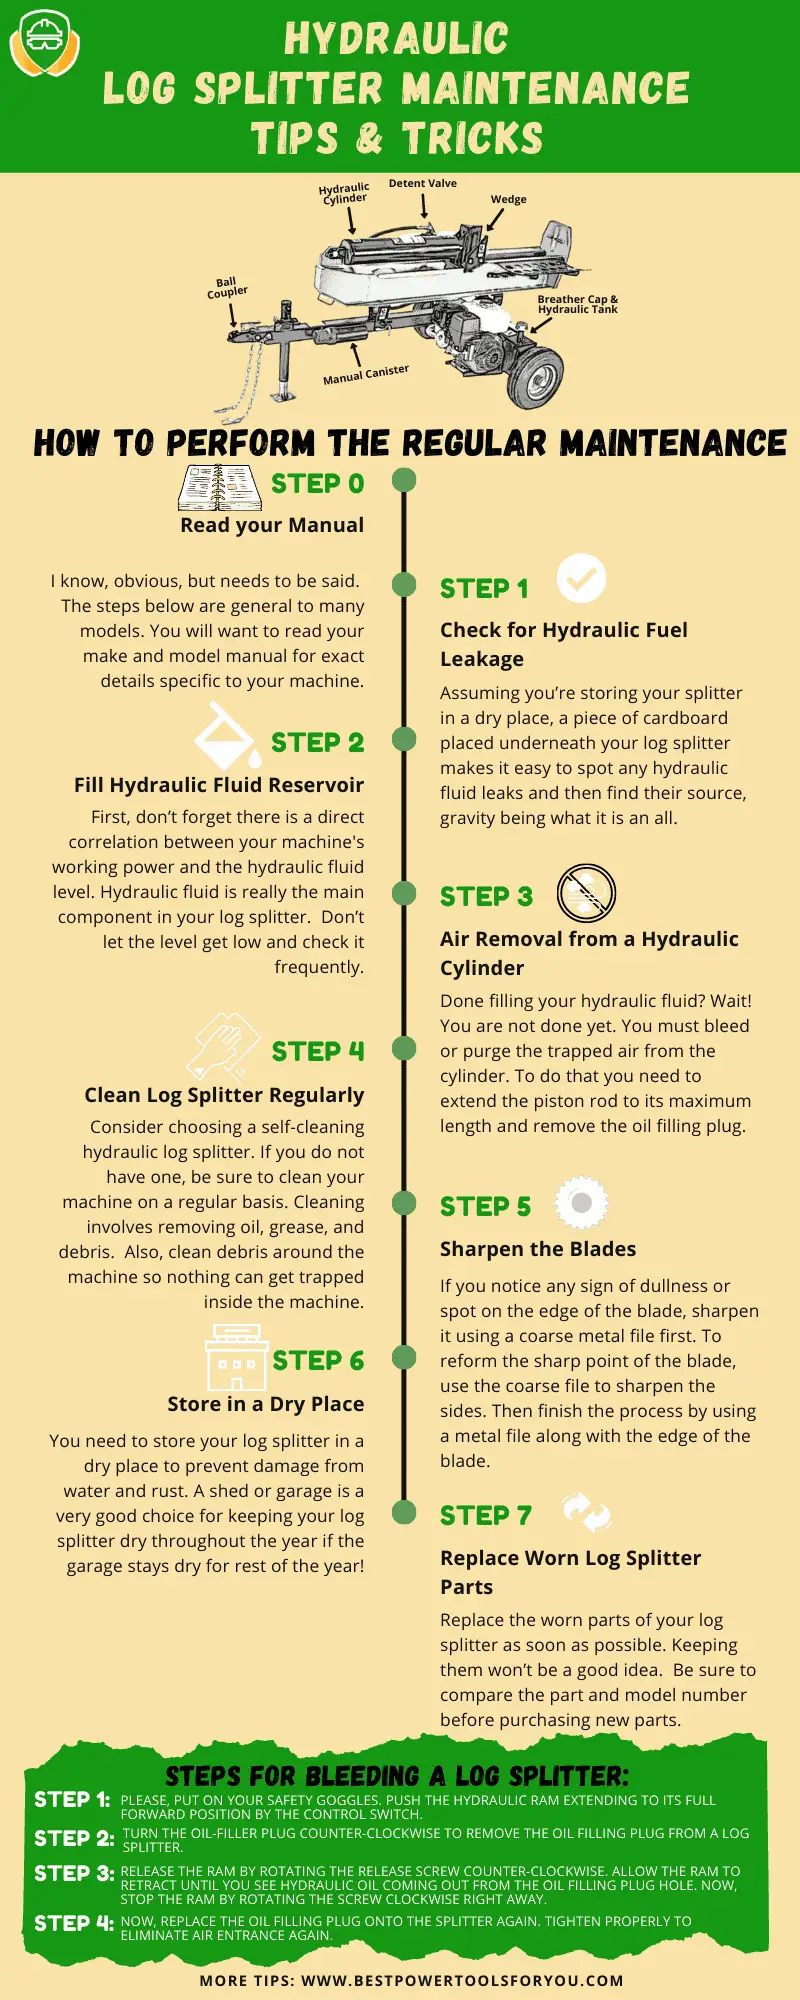
STEP 0: Read your manual.
I know, obvious, but needs to be said. The steps below are general to many models. You will want to read your make and models manual for exact details specific to your machine.
STEP 1: Check for Hydraulic Fuel Leakage
I’m a fan of cardboard. Assuming you’re storing your splitter in a dry place, a piece of cardboard placed underneath your log splitter, makes it easy to spot any hydraulic fluid leaks and then find it’s source, gravity being what it is an all:) Be sure to wear safety gloves and safety glasses while performing this leak test, especially if underneath looking up for the leak!
STEP 2: Fill hydraulic Fluid Reservoir
First, don’t forget there is direct correlation between your machines working power and the hydraulic fluid level. Hydraulic fluid is really the main component in your log splitter. Don’t let the level get low and check it frequently. For maintaining the proper fluid level you need to remove the oil filling cap/dip stick, check levels and fill as necessary. Be sure you do this on level ground.
Additionally, most manufacturers recommend a hydraulic fluid change ( and filter) every 100 hours. If your wondering about: What hydraulic oil should I put in my log splitter? Whats the recommended method for oil change…? We talk about log splitter hydraulic fluid change in this article.
STEP 3: Air Removal from a Hydraulic Cylinder
Done filling your hydraulic fluid? Wait! You are not done yet. You must bleed or purge the trapped air from the cylinder. To do that you need to extend the piston rod to its maximum length and remove the oil filling plug.
After that, twist the release screw in a counterclockwise motion as fast as you can. This will make the piston rod to draw back into the cylinder, which will release the trapped air. This one is very important for maintenance. When purging the cylinder, please stay clear from the piston rod and use your PPE.
STEP 4: Clean log splitter regularly
Consider choosing a self-cleaning hydraulic log splitter. If you do not have one, be sure to clean your machine on a regular basis. Cleaning involves removing oil, grease, and debris. Also, clean debris around the machine so nothing can get trapped inside the machine. Always remember to turn off the machine before performing the cleaning work.
A major part of a clean log splitter is a clean ram, which means no rust and plenty grease. Be sure to sand off any rust and make sure the entire thing is well greased (no dry spots – which will lead to rust). This will help lengthen the life span of your hydraulic seals.
STEP 5: Sharpen the blades
If you notice any sign of dullness or spot on the edge of the blade, sharpen it using a coarse metal file first. To reform the sharp point of the blade, use the coarse file to sharpen the sides. Then finish the process by using a metal file along with the edge of the blade.
STEP 6: Store in a dry place
You need to store your log splitter in a dry place to prevent damage from water and rust. A shed or garage is a very good choice for keeping your log splitter dry throughout the year if the garage stays dry for rest of the year! However, using a waterproof cover to protect your log splitter is also a good idea. CHECK PRICE on Amazon for heavy duty log splitter cover
STEP 7: Replace worn log splitter parts
Replace the worn parts of your log splitter as soon as possible. Keeping them won’t be a good idea. Be sure to compare the part and model number before purchasing new parts. This will ensure you buy the exact part of your hydraulic log splitter.
This is especially true of your hoses. Inspect them regularly. No kinks or flat areas. And if they’re looking worn or possible puncture, it’s not worth loosing a finger over. Yes that’s right, several tons per square inch of pressure will do some damage. If your at all suspicious of a leak, do yourself a favor and check with a piece of paper or cardboard and replace those hoses.
For these maintenance works, you will need some common home repair tools at your reach.
- Adjustable wrench
- Combination Wrench
- Side cutting pliers
- Needle-nose pliers
- Allen-wrench
- Earmuffs
Above mentioned tools are the most common home-keeping tools you should have. To keep them sorted and carry on the job you can definitely consider an electrician belt. These belts are awesome at a professional level or just around the home use.
Steps For Bleeding a Log Splitter:
I cannot stress enough the importance of bleeding the hydraulic lines. If there’s air in the system, your ram is never going to reach full power. Many models will self bleed merely by moving the wedge back and forth a dozen cycles or so. But you can also follow these steps to bleed the air out:
Step 1:
Please, put on your safety goggles. Push the hydraulic ram extending to its full forward position by the control switch.
Step 2:
Turn the oil-filler plug counter-clockwise to remove the oil filling plug from a log splitter.
Step 3:
Release the ram by rotating the release screw counter-clockwise. Allow the ram to retract until you see hydraulic oil coming out from the oil filling plug hole. Now, stop the ram by rotating the screw clockwise right away.
Step 4:
Now, replace the oil filling plug onto the splitter again. Tighten properly to eliminate air entrance again.
In addition, be sure to read carefully the operators manual that comes with the specific hydraulic log splitter that you bought. The specific kind of maintenance procedure will be available in the manual. Read the instructions carefully. Most of the manuals have specific hydraulic log splitter maintenance tips for their product. This will help you to operate the hydraulic log splitter safely and efficiently.