Log Splitter

How Does a Log Splitter Work?

Splitting logs the old-fashioned way with an axe can be a very enjoyable activity, but it’s physically demanding and not very efficient. 

If you’ve got a lot of logs to process, the only logical solution is to use a log splitter.

Log splitters speed up the task at hand exponentially and save your back in the process, but how exactly do they work?

You wouldn’t be the first one to wonder how these mechanical marvels get the job done. Not to worry though. In this article, we’re going to cover all the essentials and bring you up to speed.

What are the Different Types of Log Splitter

You’d be forgiven for thinking a log splitter is a log splitter and that’s that, but there are actually three different types of log splitter: manual, hydraulic, and kinetic.

Each of these has certain benefits and limitations. To decide which one, if any, is right for you, you’ll need to think carefully about what you require from a log splitter.

Let’s discuss each type individually…

Manual Log Splitters

By far the most simplistic of the bunch, manual log splitters are technically also hydraulic mechanisms, but their power is built up by the user rather than a motor.

Available as foot or hand-operated units, they work in a similar fashion to a car jack.

Foot-Operated

Some foot-operated log splitters are vertically oriented, but most are floor-bound mechanisms usually just over a meter in length. They normally consist of a foot pedal, a hydraulic pressure plate, a loading platform, and a splitting wedge at the opposite end.

Once a log is loaded onto the platform, the base against the pressure plate, you simply use the foot pedal as if you’re inflating an airbed. The hydraulics kick into action, and with every step, the pressure plate inches the log towards the splitting wedge.

Eventually, enough force builds up between the log and the wedge that the log splits clean in two.

There are even very basic foot-operated log splitters that don’t rely on hydraulics at all and instead use a rail system to force the log into the splitting wedge.

Level-Operated

Lever-operated manual log splitters are essentially the same thing except you use your hands to power the hydraulic ram system. They usually come with two levers.

One lever usually moves the pressure plate quickly but with a minimal driving force, while the other moves the ram slowly but with an immense amount of pressure.

Check out one of our favorite manual log splitters here:

Sun Joe LJ10M 10-Ton Hydraulic Log Splitter

Let’s summarise with a quick manual log splitter pros and cons list…

Pros:

  • Easy to Use – Not much can go wrong with this design. It’s a simple operation and they’re easy to maintain.
  • Portability – They’re not exactly featherweight, but they’re certainly more transportable than other kinds of splitter.
  • Affordable – Generally speaking, manual log splitters are far easier on the savings account than others.
  • Exercise – While using them doesn’t require the physicality an axe does, it’s still a good bit of exercise.

Cons:

  • Exhausting – You’ll definitely feel it in your shoulders or quads the next day.
  • Not Too Fast – Most manual log splitters don’t get the task done much faster than an axe.

[amazon box =”B00VPJAPS2″]

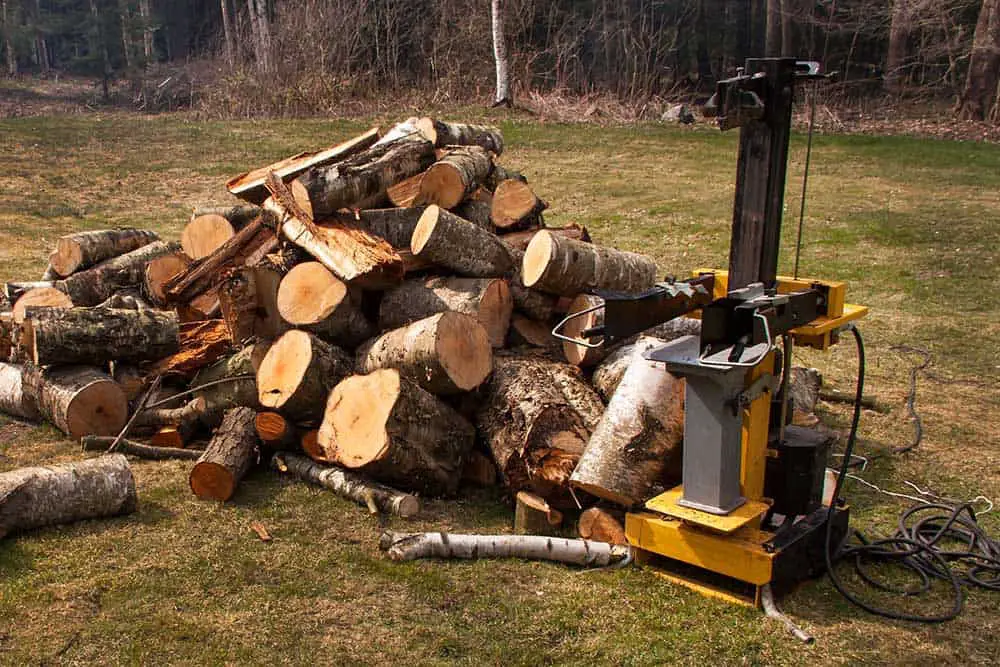
Hydraulic Log Splitters

Up until fairly recently, hydraulic log splitters were the only premium option on the market, with two subtypes to choose from: electric or gas.

They work in fundamentally the same way, just with a different power source. Electric splitters are often not much larger than manual splitters, but gas splitters can be great big bits of machinery.
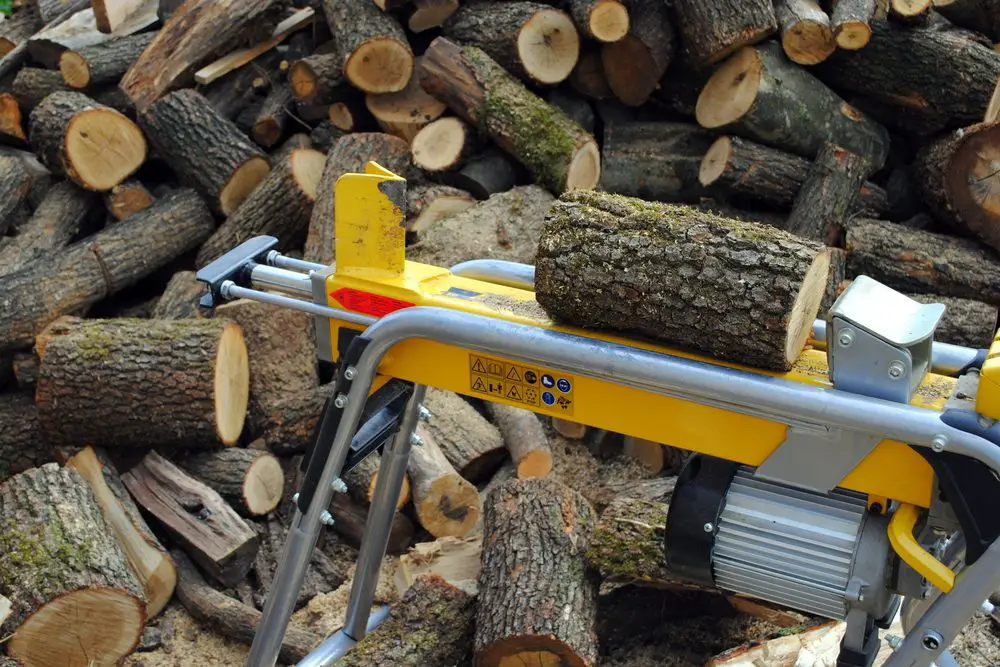
Electric Hydraulic

Featuring a simple button-start, the 5 horsepower electric motor kicks into action and triggers the 2-stage hydraulic oil pump.

The pump uses a pressure sensor to calculate the GPM required to either push the log into the splitter or retrieve the ram so another log can be loaded.

Once the pump calculates the necessary pressure it sends oil to the hydraulic cylinder responsible for pushing the log into the wedge.

Gas Hydraulic

Gas hydraulic log splitters are more powerful than their electric counterparts and don’t need to be plugged into an outlet, but they run on the same principles.

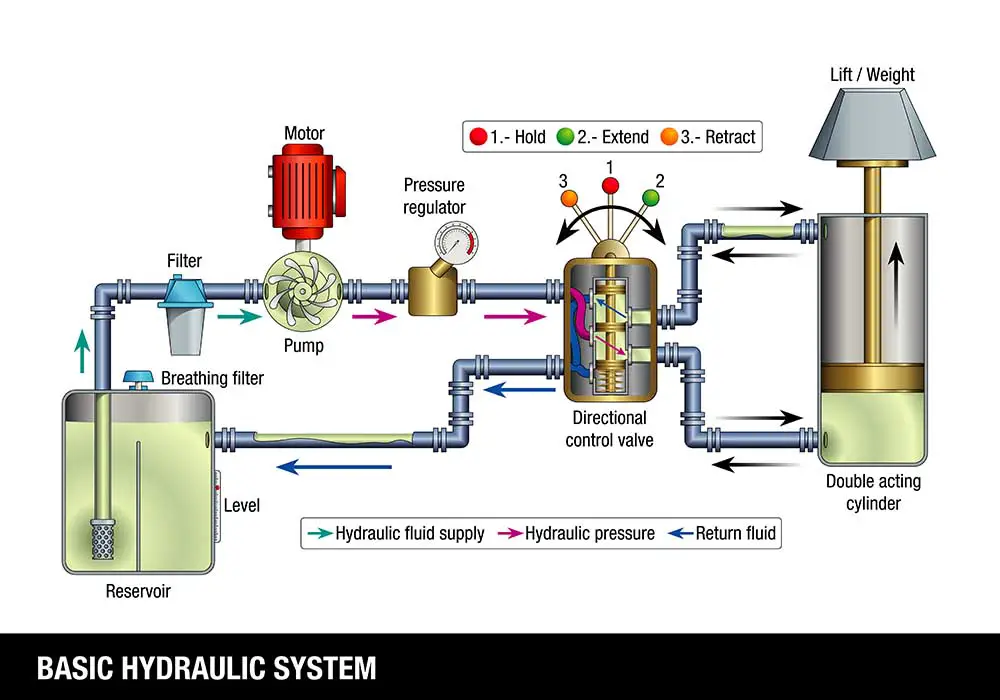
They have a 2-stage hydraulic pump housing two gear pumps and a bypass valve. They’re capable of both hydraulic pressure (PSI) for force and hydraulic flow (GPM) for speed.

As the log is pushed quickly into the splitter, back pressure builds to around 700-800 PSI, triggering the bypass valve in the pump. Now the larger of the gears start passing oil back into the pump inlet.

From here the small gear gets to work building the pressure for some log splitting action.

Excess oil then completes a circuit from a directional valve through a filter to ensure no particulate matter has found its way in, back into the reservoir where it is cooled and air bubbles are allowed to settle before the oil is pumped once again.

Here’s one of our favorite hydraulic log splitters for a closer look:

Champion 7-Ton Compact Horizontal Gas Log Splitter with Auto Return

Let’s distill all of this down to another digestible pros and cons list…

Pros:

  • Powerful – Even the most formidable logs don’t stand a chance against these machines.
  • Require Minimum Effort – All you have to do is load the log and enjoy the show.
  • Fairly Efficient – Although plate retraction can be a little sluggish, this is a far more time-effective way to process a large number of logs.

Cons:

  • Expense – These things are complex bits of machinery and their pricing reflects that.
  • Maintenance – The more complex a system is, the more maintenance it will require.
  • Portability – Although some large gas log splitters are fitted with hefty wheels, they’re not exactly easy to move around.

[amazon box =”B00BBDCGSY”]

Kinetic Log Splitters

The most recently invented of the three splitter types is the kinetic log splitter. Kinetic energy is no new-fangled concept, it’s just taking us some time to realize how it can be used in the context of a log splitter.

Also known as flywheel log splitters, kinetic splitters utilize huge flywheels to convert energy from the engine into log splintering excellence. A flywheel is a round mechanical device used to harness and store energy.

Picture an antique sewing machine. You have the foot pedal that spins the large wheel, which in turn spins the smaller wheel attached to the machine. These are flywheels. They force the pressure plate along the platform into the splitting wedge and voila! Firewood for days.

What makes kinetic log splitters so special is their speed. They can complete their push/retraction cycle in as little as 2.5 – 3 seconds, whereas hydraulic splitters tend to take around 12 – 15 seconds to reset.

This is because the flywheels are constantly building pressure before their explosive release. Then the remaining energy in the momentum of the wheels automatically retracts the pressure plate.

Here’s a kinetic log splitter that’s turning heads at the minute:

Generac WR31110ACNG 10 Ton Kinetic Log Splitter

Let’s finish things off with one last pros and cons list.

Pros:

  • Speed – These things zip through logs insanely fast.
  • Minimum Effort – Much like hydraulics, all you have to do is load the log.
  • Fuel-Efficient – Kinetic log splitters require less fuel than hydraulic mechanisms.
  • Ease of Maintenance – They require far less maintenance than hydraulic splitters and said maintenance is easier to carry out.

Cons:

  • Price Tag – They’re the most expensive splitters of all.
  • Strength – Kinetic splitters are only really supposed to be used for soft and medium woods. Hardwood is best left to hydraulic splitters.

[amazon box =”B08QY2HPX9″]

Final Thoughts

That’s all there is to it, folks. No longer will these contraptions confuse.

Now you’re fully informed, you can confidently decide which one is best for you and your log splitting workload.

Read More
Log Splitter

Is Hydraulic Fluid Poisonous?

If you own any heavy machinery, be it a car, tractor, or something else, you will know what hydraulic fluids are. They must be changed and replaced periodically to ensure your vehicle operates correctly. 

It is really easy to accidentally spill some of these fluids onto your skin while changing them. What if you have young children that wander past and decide to take a sip of the hydraulic fluid? 

Poison Control states that the ingestion of oil-based hydraulic fluids is potentially dangerous. They can enter your airway with less difficulty than the water-based options which leads to health issues.

If hydraulic fluids are ingested and reach the stomach this is less of a problem as they are destroyed in the acid and generally only result in diarrhea.

Hydraulic fluids are designed to be as non-toxic as possible to prevent problems from occurring. There has been a big move within the industry towards the use and production of safer substances.

That being said, all hydraulic fluids should be treated with caution as many do still contain harmful chemicals. Assume that they are toxic and take all of the necessary safety precautions when you are working with them. 

Appropriate safety precautions to take include tying long hair back, wearing protective goggles, a dust mask, an apron, and gloves to protect your skin. Inhaling toxic fumes from hydraulic fluids can result in damage to your nervous and respiratory systems.

You should only work with hydraulic fluids in open air or rooms with good ventilation systems. Take care to close all containers securely when not in use and be aware of spills and slippery floors.

What does hydraulic fluid do to the skin?

Most hydraulic fluids will not cause a great deal of damage to your skin. If you do get any on 3you, you should not be lax about it and instead, immediately go and wash it off using soap and warm water.

If you work with hydraulic fluids regularly it may be worth investing in a barrier cream. These have been specially designed to protect your skin from the harmful effects of hydraulic fluids.

Some hydraulic fluids can cause irritation to your skin resulting in swelling and redness. This is because the fluids prevent the cholinesterases in the body from working. This can lead to contact dermatitis, eczema, and even skin cancer.

This last one is only likely if you frequently expose your skin to hydraulic fluids. 

If the hydraulic fluid is pressurized then it will likely cause a burn to form on your skin. If it is under any pressure exceeding 100 PSI then the fluid has the potential to penetrate your skin. This is known as hydraulic fluid injection and can be very dangerous.

It is said to feel like a sting but will quickly swell and become painful. If it is not treated promptly, this can lead to your tissue becoming necrotic. This can lead to amputation, or in extreme cases, death. 

If you get hydraulic fluid in your eyes you should immediately find an eye bath or eye washing station. Flush your eye by placing it under a stream of lukewarm water.

Allow the water to run over your eye for at least 15 minutes, blinking occasionally. You may have an oily film residue left on your eye for a few hours, causing your vision to appear blurry. 

Is hydraulic fluid carcinogenic?

The Environmental Protection Agency (EPA), International Agency for Research on Cancer (IARC), and the Department of Health and Human Services (DHHS) have not categorized hydraulic fluids as being carcinogenic. 

While it is not deemed to cause cancer, there are notable adverse side effects from working too closely with hydraulic fluids. This is because one of the main components is mineral oil, which is a petroleum distillate.

These chemicals have strict regulations, which has led to the Occupational Safety and Health Administration setting an exposure limit. This is 2,000 mg / m3 for a 40 hour work week spread over 8 hour working days. 

In 2019 a study was conducted into hydraulic fracturing chemicals. This tested the fluids and water run off from 1,173 different chemicals. In the study, they compared data on many different chemicals from different sources to work out their carcinogenic effects and risks.

This data came from the HF chemical data from the EPA, the agent classification data from the IARC, the Carcinogenic Potency Database (CPDB) from Toxnet, and the Chemical Abstract Service Registry Numbers.

Compiling this data allowed scientists to understand the potential carcinogenic effects of hydraulic fluids. The results showed that when compared to the IARC data 48 chemicals in hydraulic fluids are potentially carcinogenic, including 14 that are definitely carcinogenic.

When compared to the CPDB data on rats and mice, it is suggested that 66 chemicals are possibly carcinogenic. 

Is hydraulic fluid flammable?

We know that when the temperature drops low enough hydraulic fluids can freeze, but can they catch fire if they get hot enough? There are 5 main types of hydraulic fluid – mineral oil, fire-resistant fluid, water and oil emulsions, water-glycol, and phosphate esters. 

Mineral oils are based in petroleum and are flammable in temperatures between 300 to 600 degrees Fahrenheit. 

Water-based hydraulic fluids are inflammable. This is because they contain at least 35% water, and can reach up to 80% concentration. This water cannot catch fire and so neither can the hydraulic fluid. They can cause issues with corrosion though. 

Fire-resistant fluids you would expect to not be flammable, but this is untrue. Under extreme enough temperatures and pressure, they too will ignite. The risk of this happening is greatly reduced. All fluids with the exception of the mineral oil-based ones are considered to be less flammable and hazardous. 

When hydraulic fluids are traveling through the hydraulic systems they are underneath incredible pressure of around 2,000 – 3,000 PSI. This means that if there is a hole anywhere, atomized hydraulic fluids will be allowed to escape.

In this situation, the fluid becomes very flammable and explosive. These dangers have been noted at as low as 250 PSI too. 

Read More
Log Splitting FAQ Ultimate Guide
Log Splitter

Log Splitting FAQ Ultimate Guide

Can you split logs with a chainsaw

Thinking about splitting logs with a chainsaw? While it is certainly tempting as it would probably allow you to get the task done much more quickly, you should probably try to avoid it.

There can be some safety problems associated with using a chainsaw for splitting logs. If you are going to split the log, it’s often better to use an axe.

With that being said, some people do still choose to split logs with a chainsaw, they usually just take extra safety precautions. Splitting firewood with a chainsaw can be handy if you struggle with your back, hips or knees.

Log Splitting using chainsaw

If you are planning on splitting the logs with a chainsaw, you should make sure that the device is well maintained. For instance, make sure that the chainsaw has been oiled up well in advance, that it’s working well and that the chain is sharp enough for you to complete the task without many issues.

If the wood is particularly dirty or if it’s dry, it’s a good idea to get a half chisel chain since the full chisel will break down much more quickly. In addition to this, if you are going to be splitting the logs near to the ground then you should use a worn down chain to avoid damaging a new one.

Do I need to split small logs

Is it really necessary to split small logs? The short answer is yes, it can be a good idea in order to dry them out before you put them onto a fire. It’s not something that you necessarily need to do, however.

There are a couple of things to keep in mind when it comes to splitting small logs. Firstly, it may not really be worth your time to split logs that are smaller than 4 inches.

For fireplaces, it’s usually best to have firewood that’s split 3-6 inches wide and roughly 16 inches long.

Splitting logs can take up a lot of your time that may be better spent trying to split larger logs. Splitting smaller wood may also come with its own safety risks since there’s less there for you to cut, so make sure that you’re extra careful if you are going to split it

How do you split a small log

Before you try to split any kind of log, make sure that you have your gear in place and that you have taken all of the safety precautions that you need to take in advance.

Once you have done this, take your maul (a kind of ax), and stand in a position where your shoulders are slightly squared off in relation to the log in question.

You don’t need to put one of your feet forward and step back. Make sure that your primary hand is positioned under the ax’s head, and the non dominant hand should be gripping the handle on the bottom. 

For a smaller log, you should then swing towards the center in order to split it. This is slightly different than what you would do for a larger log, where you would need to cut closer to the outside area of it. Repeat this process if you don’t split through the log straight away. 

How long should logs dry before splitting

The question about when the best time to split wood is one that’s highly debated, and the answer can vary depending on who you ask. 

It’s worth noting straight away that the whole purpose of splitting the wood in the first place is to make it much easier to burn.

You need your firewood to be dry when you’re burning it – logs that have been recently freshly chopped from a tree are more likely to have excess moisture, so it’ll be harder to burn them.

When your log is split, it’s already going to be slightly easier to burn because splitting the wood lowers the surface area of the bark on the log.

With that being said though, you can actually split wet logs, it’s usually just a little more difficult to do.

You may need to wait less time to split certain species of wood too, since some can dry out much quicker than others. For this reason, it’s best to make this decision on a tree by tree basis.

How to make a log splitting screw

Building your own log splitting screw can be very handy for when you want an easy way to split wood. To start with, create your frame using some square tubes.

It’s good to look for tubes measuring around 60 mm x 60 mm x 2 mm, though this will depend on the size that you need. If you want to move the frame around relatively easily, you can put some wheels underneath the frame.

Then you will need to put an electric motor in the frame, and put some pulleys in to ensure that the spin of the axis rotates at around 300 rpm. There should be around 4 pulleys – one at the motor, two in the middle axis, and then one more at the final axis.

Put a conical screw onto the final axis – you can usually buy these screw online and can get a size that will work for you.

You should put a piece of iron plate that is around 6mm thick underneath the screw. After you’ve done this, you should be all ready to go.

How to make a log splitting stand

Looking to make splitting logs so much easier? Make yourself a DIY log splitting stand, or a log splitting block. This is a whole lot easier than splitting a log on the floor.

This is mainly because it’s good for your safety, since when you are cutting, the axe will land much further away from your feet. You are also much less likely to hit rocks while you are splitting the log and this can help to ensure that the axe lasts for a longer period of time.

To make a log splitting stand, all you really need is a big bolt of firewood. Elm is especially handy, or you can use a flared stump of the tree. It’s important to ensure that the splitting stand measures around 13 to 16 inches, as it may be more likely to split if it’s significantly shorter than this.

You can attach an old, large tire onto your chopping block too with a couple of screws in order to hold everything into place. This is ideal for stopping any wood from falling off the block. 

How to make a log splitting wedge

Splitting logs by yourself can sometimes be a pain, but it’s a lot easier to do it if you have a log splitting wedge that works well. Thankfully, you can easily make one yourself.

To start with, get some log splitting blades – you can usually find these online from specialist retailers.

You will then need to join them all together – grab the inside angles of the blades, remove the inner corners and then position two of the blades at 90 degree angles from each other. You can then take the two other blades and do the same thing, welding them together.

Then, make sure that you have a pipe for the wedge and connect the blades up to the pipe. The pipe should measure around 1 to 20 inches. You can attach the blades to a support filler bar.

After this, grab you hydraulic pump and get it set up. Make sure that you follow the instructions for the hydraulic pump as this will tell you how to get it set up in a safe, efficient way. Finally, you will just need to connect the blades that you’ve set up with the hydraulic pump. You can then use it once you turn it on.

You can create all sorts of different log splitter wedges too, from electric ones to gas to even 30 ton powerhouses.

How to sharpen a log splitting axe

Before you try to split a log, you first need to make sure that your axe is sharp enough. Some people say that there’s no need to sharpen your axe, but it’s much better to do so in order to get a clear cut. Blunt edges on the axe can sometimes result in the axe bouncing off the wood

To sharpen your axe, you will need something like a bastard’s file in order to do it. It’s worth getting a long one as this will be much easier to use.

Put the axe onto a stool or any other surface – alternatively, you can put it in a vice if you have one. Then, using the file, move it in a forward motion along the edge of the axe – eventually you will feel a much sharper edge appearing.

Make sure that you are sharpening the axe at around a 45 degree angle if you can, though this will depend on the axe in question.

It’s also important not to over sharpen the tool. You don’t want the tool to start bouncing off the wood when you’re using it, but you don’t want it to be too sharp either.

How to use a log splitting grenade

Before you use a log splitting grenade, it’s imperative that you put on safety gear, otherwise you might get hurt. Put on some safety goggles and gloves, and all of your usual gear.

A log splitting grade is essentially a very rough mount of steel – it looks a little bit like a pyramid. Then you put it into the log, and it starts to split the log apart.

Put it into place using a club hammer, then push it all the way into the log using a sledge hammer. Some logs are tougher to split than others – with these, you may need to apply a little more force to put it into place properly.

Eventually, you should be able to split the log in half. This is particularly handy for tougher logs that your axe or maul can’t penetrate properly. 

How to use a log splitting maul

Log splitting mauls are very handy if you need to split particularly big pieces of wood. It looks a lot like an axe in many ways, but the main difference is that the maul has a much flatter butt and is also wider.

The split is created using the sharper side, while the flat end is what you use in order to push a wedge into the log – in short, it’s the perfect tool for log splitting.

Before you use the maul, take a couple of safety precautions. First of all, make sure you have a base like a splitting stump or something to work off rather than splitting the wood straight from the ground.

This is so the maul doesn’t end up hitting your leg when you use it.

Also, if you’re cutting a piece of wood that has a crack in it, you should start from that location as it makes the splitting much easier. Don’t split into an end with a knot, and try to work on fresher wood rather than dry wood.

Grab your maul, and then use the blunter side to make cracks in between the fibers of wood. Then, with the other edge, you split the wood apart.

Take your aim into the log, then chop it going in an up and down motion rather than constantly taking swings. You can repeat this process then as many times as you need to.

What is the difference between a splitting maul and an axe

While axes and mauls look quite similar, there are a number of differences between the two of them. For starters, axes are usually quite thin and sharp, and they can often make wood chips as a result of this.

A log splitting maul, on the other hand, features a blunter edge and it’s much thicker. It’s primarily used for splitting rather than chopping wood.

Of course, it’s also worth noting that using an axe isn’t always the best choice when you’re splitting wood, since the axe is more likely to get stuck because of the way that it’s constructed.

Likewise, the maul isn’t really sharp enough for chopping wood. If you try to chop the wood using a maul, the blunt edge can start sliding off and this can be very dangerous.

Axes and mauls also have different weights. A maul tends to weigh around double of the weight of an axe. This makes it a lot harder to swing a maul than an axe. Mauls also have much longer handles than axes do, so they can reach the ground more easily.

What is the fastest way to split wood with a log splitter

Log splitters make the process of splitting wood significantly faster than it would normally be if you were doing it manually. 

If you’re used to using log splitters or you want something easy to use at home, it’s worth getting a horizontal or vertical log splitter. With these, all you need to do is lay the log on the top of the machine, and it will do the rest of the work for you.

Log Splitting FAQ Ultimate Guide

Make sure you have a log of the right size though, since some logs are much too big to lift in a safe manner so you’ll need to cut them down to size first. 

To use a vertical log splitter and to split your logs quickly, start off by putting your splitter into the vertical position. Then, stand the log up and cut them in half.

You can then put the splitter back into the original position that it was in, and then split it from there. You can also use a 4 way wedge to make the task even faster if you are splitting a number of logs at once. 

What’s better for splitting wood, axe or maul?

It’s easy to think that axes and mauls are both suitable for splitting wood, but it goes without saying that one is drastically better for splitting wood than the other. It’s usually much better to use a maul for splitting wood though, and here’s why.

If you’re going to be splitting very large pieces of wood, the heavy weight of the maul is going to give you more power to use. This is ideal, since you aren’t going to need to hack away at the log for as long. A maul can sometimes be a little tricky to swing for people that are smaller though.

You can alternatively use a specific splitting axe for small pieces of wood, since it’s much easier to swing. It’s just best not to use a standard axe for splitting, since this can cause some safety issues. 

In short though, the splitting maul is generally your best choice since it is designed specifically for splitting wood.

How to use a log splitting wedge

A splitting wedge is very handy for splitting wood. This pyramid shaped tool will drive straight into any wood, which helps for splitting apart the wood. It’s also a fairly simple tool to use, regardless of your experience level. 

To start with, here’s the basic concept: Put the wedge into a crack that’s already present in the log. If you don’t have a crack in the piece of wood, then you can just try to drive it into the log using your log splitting maul.

If you want to use a log splitting wedge, it’s definitely worth your time to buy more than one of them.

You’ll need one very sharp one, and one that’s slightly wider that can put more force into the log. You should also get a decent sledgehammer so that you can get it done even faster. As with anything though, make sure that you’re taking the right safety precautions such as wearing the proper gear to prevent injury.

Read More
basic components of a hydraulic system
Log Splitter

What Are The 7 Basic Components Of A Hydraulic System

Hydraulic systems are incredibly complex and all vary slightly depending on their intended use. Every system must contain 7 different basic components in order to function correctly.

These are a reservoir oil tank, pipes, a hydraulic pump, a power source, an actuator, valves, and filters.

The reservoir oil tank is where the hydraulic oil is stored. This reservoir protects the oil from contaminants which could hinder the functionality of the entire system.

The pipes are a relatively self-explanatory component, used to transfer the hydraulic fluids around the system.

basic components of a hydraulic system

The hydraulic pump is what draws the fluid out of the reservoir and into the rest of the system. This is done by creating a vacuum at the pump inlet. This pushes fluid out of the reservoir and into the pump,

Here it is forced into the pump outlet and around the system.

The power source tends to be an electric motor and is required for mechanical functions. The actuator is used to translate the hydraulic power of the fluid to mechanical power for operation.

The valves dictate the flow rate, direction, and pressure of the fluid around the system. Finally, the filters are used to protect the system against contamination which could cause blockages and damages.

What are the most common causes of hydraulic system failure?

There are 3 common causes of hydraulic system failures.

The first pertains to the hydraulic lines. If they are routed incorrectly then they can be placed under increased stress from movement and vibrations, which can lead to damage.

Another reason the lines may fail is if the pressure traveling through them is too high.

It is estimated that 80% of hydraulic system failures are caused by contaminated hydraulic fluids. If debris enters the hydraulic fluid this then gets circulated around the system.

This can lead to damage and will make the hydraulic system function much less effectively.

The other main issue with hydraulic systems is seal failure. The seals are commonly made from soft and flexible materials like rubber and polyurethane which can easily be damaged by heat and chemicals.

If the seals are compromised, the system cannot function properly and this can cause a more widespread problem.

Why do hydraulics use oil instead of water?

The main reason for this is due to the need for lubrication within the hydraulic systems. There are many moving parts contained within a hydraulic system that rub against each other.

Without lubrication, this would lead to corrosion and premature wear. Oil creates a film on the surface of moving parts which acts as a lubricant during movement.

The temperature within a hydraulic system can get very high, and water does not have a particularly high boiling point. As the water boils it becomes highly compressible, which causes the system as a whole to perform much less effectively.

Not only do hydraulic oils have a higher boiling point, but they also have a lower freezing point. This means that the system can function in a large temperature range.

Water will cause the internal components of the system to rust and corrode in the presence of air. This leads to premature degradation of the system.

How often should you change hydraulic oil?

As a rough guide, you should change the hydraulic oil in your system at least once every 4 – 5 years.

This time period will vary according to the type of vehicle, the climate you live in, your regular driving conditions, the usage of the vehicle, and how regularly the hydraulic systems are maintained.

Your owner’s manual should contain recommendations from the manufacturer about hydraulic oil change intervals for your specific vehicle. This is commonly a good starting point.

You should keep an eye out for indicators that the oil needs changing sooner. This could be a drop in the oil levels or a burnt aroma being emitted.

Check the color of your oil too. It should be clear or transparent. If the color turns brown or red, you should replace the oil prior to the next use.

What happens if you use the wrong hydraulic fluid?

This is a really common mistake concerning hydraulic systems. The fluid is used for many different functions within the system so it is vital you choose the correct one.

If the wrong fluid is used then it can cause the system to break down prematurely and decreases the performance efficiency.

The most important factor to get correct is the viscosity of the fluid used. If this is too high then it will not be an effective lubricant which can cause parts to wear quickly.

This in turn will increase the fluid friction and system power losses. This increases the power consumption of your system and reduces the efficiency.

If the viscosity is too low then the hydraulic pumps and the motor can break long before they should. It can also cause an increased risk of contamination within the system.

How often should a hydraulic filter be changed?

As with hydraulic oil, your vehicle’s manufacturer should give an indication of the filter replacement schedule in the owner’s manual. This tends to be after an arbitrary number of hours of usage.

This is useful if you are clueless about hydraulic systems, but is often not the most accurate measure. If you leave the filters too long it could cause them to become clogged and the efficiency of the system will be reduced.

If you change the filter too soon then you waste money and resources by not using it for the full lifespan.

Alternatively, you can use an element control indicator that measures the drop in pressure across the filter. You should look at the number of bar pressure drops when it is at capacity and take note of this.

If it reaches a critical value, then it is time to replace the filter. For instance, if your filter has a 4 bar pressure drop at capacity and the reading is 3 bar, you need to replace the filter.

Read More
What Are Different Types of Hydraulic Fluid
Log Splitter

What Are Different Types Of Hydraulic Fluid?

There is a range of different types when it comes to hydraulic fluids and each one has its own unique properties.

Different machinery such as car transmissions and factory machinery used hydraulic fluid to run sufficiently.

Every type of hydraulic fluid is made with different chemicals with varying characteristics. Certain hydraulic fluids have a scent while others are completely odorless.

One fluid may be environmentally friendly when the next could be dangerous to our ecosystem.

What Are Different Types of Hydraulic Fluid

Determining which type of hydraulic fluid suits you best is generally down to a personal preference but there are a few important factors to consider first.

If your vehicle or machinery is in need of some care, hydraulic fluid could be the savior. Ensuring you find one that is compatible with seals, bearings, and other components is vital to help hydraulics run smoothly.

You should also consider its viscosity, fix resistance, and whether it is environmentally stable.

Using hydraulic fluid that is damaging to the environment could have dire consequences for many years to come.

To meet the various needs of different systems, there are six types of hydraulic fluids:

  • Petroleum-based fluids – Most commonly used. Readily available and economical with the best lubrication ability. Few corrosive problems. Compatible with all seal materials.
  • Emulsions (oil-in-water & water-in-oil) – Fluids mixed together that don’t chemically react with each other. Emulsions from petroleum-based oil are most often used. Oil-in-water has water characteristics but poor viscosity leading to leakage problems. Water-in-oil is fire-resistant with good viscosity and lubrication properties.
  • Water glycol – Nonflammable and commonly used for aircraft hydraulic systems. Low lubrication ability and not suitable for high-temperature applications. Prone to oxidation inhibitors. Toxic and corrosive toward zinc, magnesium, and aluminum. 
  • Synthetic fluids – Fire-resistant and suitable for high-temperature applications. Good viscosity and lubrication characteristics. Unsuitable for low-temperature applications. Not compatible with most sealing materials like nitrile.  Not environmentally-friendly.
  • Vegetable oils – Environmentally safe with good lubrication properties, average viscosity, and less expensive. Fire-resistant with certain additives. Easily oxidized and absorbs moisture. Requires good inhibitors to minimize any oxidation problems.
  • Biodegradable hydraulic fluids – Eco-friendly. Uses sunflower, soybean, rapeseed, etc as the base oil. Reduces pollution in cases of oil leaks or hydraulic hose failures. Similar to mineral oil-based anti-wear hydraulic fluids.

What is the difference between 32 and 46 hydraulic oil?

There are three grades to consider with hydraulic fluid; the viscosity grade and hydraulic oil type grade 32-46-68. The specifications are usually determined by the weight and viscosity of the oil.

The lower the number, the thinner the oil will be while the higher the number, the thicker the oil. Depending on temperatures, oil viscosity changes as it can become thinner in hotter temperatures and thicker in colder environments.

The main difference between 32 and 46 hydraulic oil is that 46 is thicker and has a more solid-like texture than 32-grade oil. Of course, 68 hydraulic oil is even thicker and more solid-like than 46.

What is the difference between ISO 46 and AW 46 hydraulic oil?

ISO (International Organization of Standardization) refers to the oil’s viscosity while AW stands for “anti-wear”. Each type of hydraulic equipment requires a different hydraulic oil.

AW oil is a premium oil designed for use with all hydraulic systems which recommend the use of anti-wear hydraulic oil. 

Most hydraulic oils are measured with the ISO grade but some with anti-wear properties are measured in other ways because they contain additives within the oil.

ISO 46 is not better or worse than AW 46 hydraulic oil. These numbers simply refer to the viscosity and not the quality of the oil. The quality is typically determined by the manufacturer.

What is the difference between ISO 32 and AW 32 hydraulic oil?

ISO 32 is the viscosity range for industrial oils. These are usually used in hydraulics but tell you nothing about the additives that may have been used.

AW 32 must contain anti-wear agents as well as other additives but these can be harmful to some applications.

The only difference is that there are additives contained within the oil when dealing with AW 32.

Can you mix different types of hydraulic fluid?

The short answer to this is, no. It is always best to avoid mixing different types of hydraulic fluids as each one has different formulations and additives contained within. These are added for different systems so it is not safe or reliable to believe two different hydraulic oils could be compatible.

Mixing different hydraulic fluids can cause serious damage to machinery and even be life-threatening. It is possible that an additive contained in one hydraulic fluid could travel up through certain hoses in vehicles and react with high hydraulic power and high voltage, potentially causing some sort of explosion.

Mixing fluids with different viscosities, but are still the same type, will impact the viscosity of the lubricant. The final viscosity will end up being variable and based upon the viscosities of the mixed fluids and how much fluid was mixed.

If the final viscosity is too low, the film thickness wouldn’t be enough to provide enough separation between two bearing elements and this could lead to failure. On the other hand, if the viscosity is too high, heat can generate and energy consumption can increase leading to a breakdown in the hydraulics.

Which hydraulic oil is thicker? 32 or 46?

Oil with a higher viscosity grade has thicker oil which is more solid-like. Therefore, 46 hydraulic oil is considerably thicker than 32. This is usually because hydraulic oil 46 weighs more as well.

Of course, hydraulic oil with a viscosity of 68 is much thicker than 46.

Is hydraulic oil the same as hydraulic fluid?

The main difference between hydraulic oil and hydraulic fluid is that the latter is used in automatic transmissions such as automobile systems. Hydraulic oil can not be used in these systems or for these purposes.

Out of all hydraulic fluids, hydraulic oil is the most common and this is why many people use these terms together. 

Hydraulic fluid is very useful in hydraulic systems such as excavators, garbage trucks, and hydraulic brakes. Hydraulic fluid is primarily used to transfer energy but it can be used in other ways too.

These range from heat transfers, sealants, lubrication, to the removal of contamination. These fluids typically have thermal stability, hydrolytic stability, a long life, have low chemical corrosiveness, and are a lower cost.

Hydraulic oil is a highly flammable fluid. It is helpful in energy transfer within a hydraulic system. As it is highly flammable, this oil shouldn’t be used in an igneous source.

If this occurs the oil spray can easily ignite under high-pressure conditions. This is one reason why many people prefer to use hydraulic fluid instead.

Hydraulic oil contains additives as well as oil. The oil isn’t only a medium for energy transfer but also acts as a coolant and lubricant. This helps to reduce corrosion in hydraulic systems allowing them to perform well under many different temperatures.

What is the difference between ISO and AW hydraulic oil?

Firstly, to understand what these hydraulic oils are, you will need to know what they stand for. ISO stands for International Organization of Standardization.

These are oils that meet the specifications of the ISO which have standards that require them to be met in most existing oils, food oils, cosmetics, medical oils, and industrial oils.

These standards were created over the years by various experts in each field. This was so oils could be of a certain quality and become easier to label. The ISO provides standards for the viscosity of hydraulic oils in order for the public to know exactly what they are purchasing.

AW stands for anti-wear hydraulic oil. ISO classifies these oils as HO (hydraulic oil). AW oils protect hydraulic machinery so that they last a long time and run efficiently. These oils are available in many viscosities and have a range of additives applied for anti-wear purposes.

AW oils are made from petroleum-based and an anti-wear additive (usually zinc dialkyl dithiophosphate – ZDDP) to protect the hydraulic pump. Each oil is made for specific application requirements so each one has unique purposes.

The base oil quality and quantity of additives mean that certain AW oils perform differently and affect the price point of various lubricants.

The main difference between both is that AW oils have additives contained in the oil while ISO oils do not.

Is universal tractor fluid the same as hydraulic fluid?

The most important factors of hydraulic oil are viscosity, wear corrosion and fire-resistant properties. These all affect the performance of a hydraulic system.

It can be considered that tractor fluid is a subcategory of hydraulic fluid as tractor fluids should be able to achieve most of the functions of hydraulic fluid.

Both fluids differ because of their properties and applications. While hydraulic oil is used to transfer power, tractor fluid is a medium for lubricating moving parts within the transmission such as bearings, final drives, and a wet brake system.

Although varied in their uses and purposes, tractor fluid and hydraulic fluid are similar but not the same.

Read More